IPv6
Function overview
This function includes IPv6 interface configuration, static routing configuration, firewall configuration, tunnel configuration, NAT configuration, etc., to realize common scenarios such as IPv6 local Internet traffic, overseas acceleration traffic, and east-west traffic between sites.
Configuration scenario examples
Scenario 1: Local IPv6 resource access
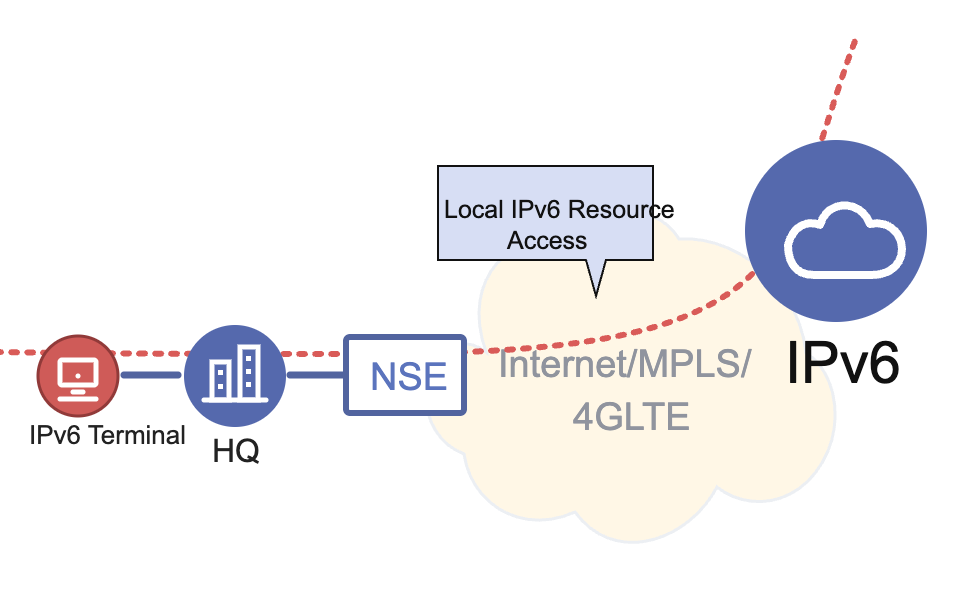
🔹 The site enables IPv6 function
『Tenant』→『Config』→『Sites』→『Edit Site』→『Global Configuration』→『Features Toggle』
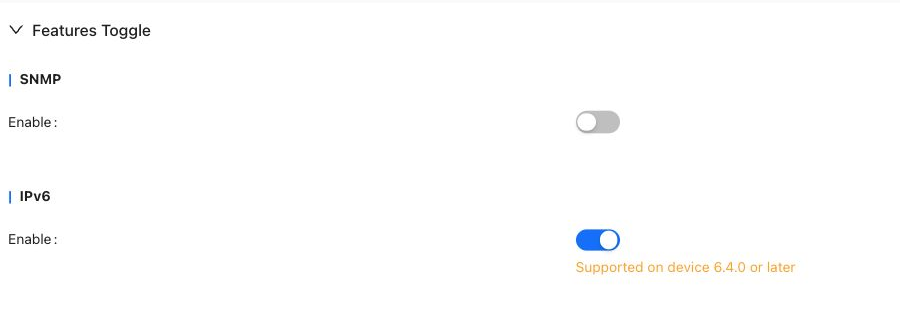
When the global IPv6 switch is not turned on, the IPv6 configuration can be saved, but it will not take effect.

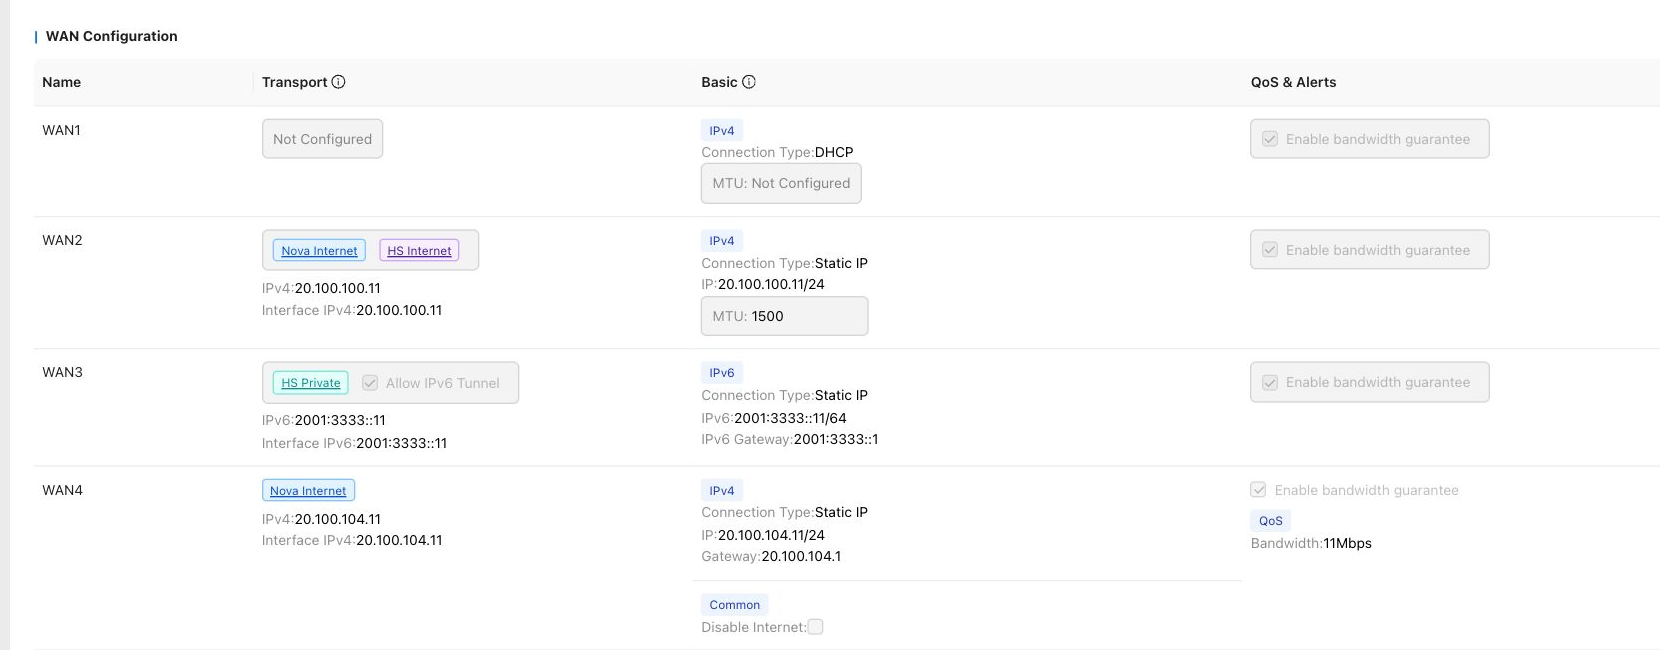
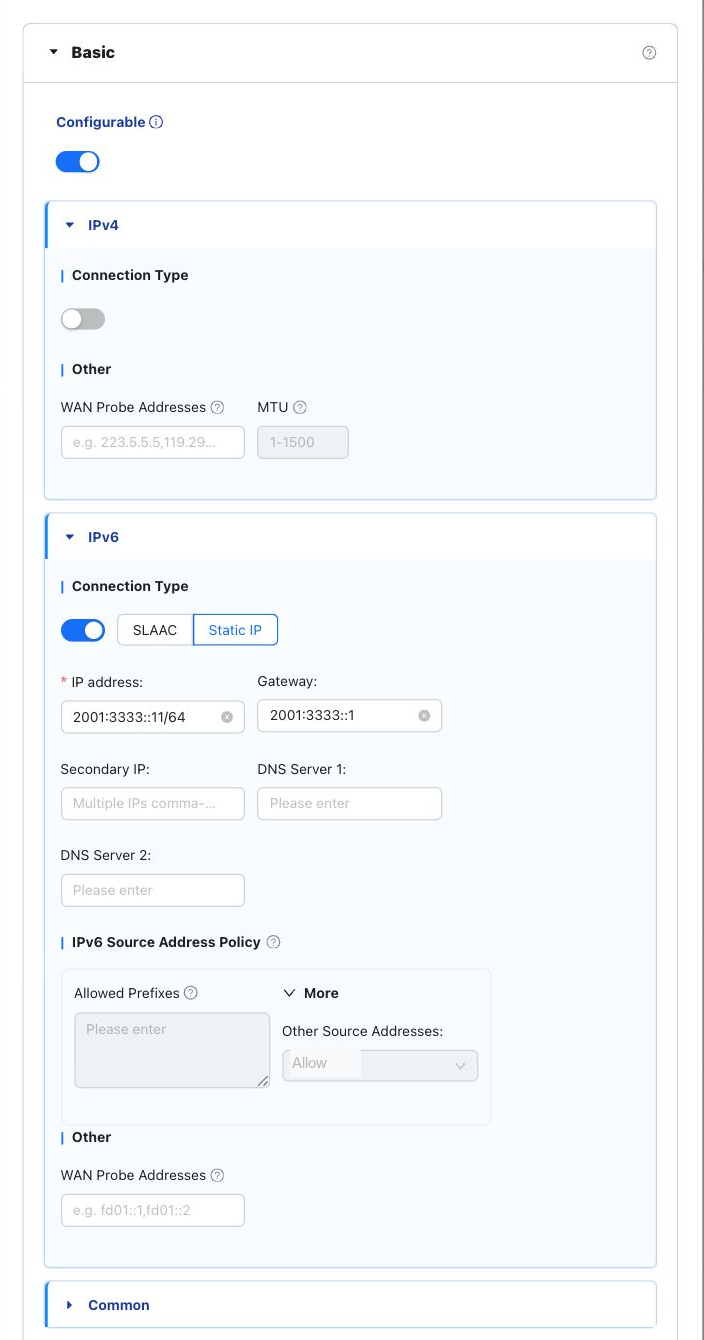
🔹 The site WAN is configured with a dual-stack address, and the behavior of other IPv6 network segments is "allowed"
『Tenant』→『Config』→『Sites』→『Edit Site』→『Global Configuration』→『WAN』→『WAN Configuration』
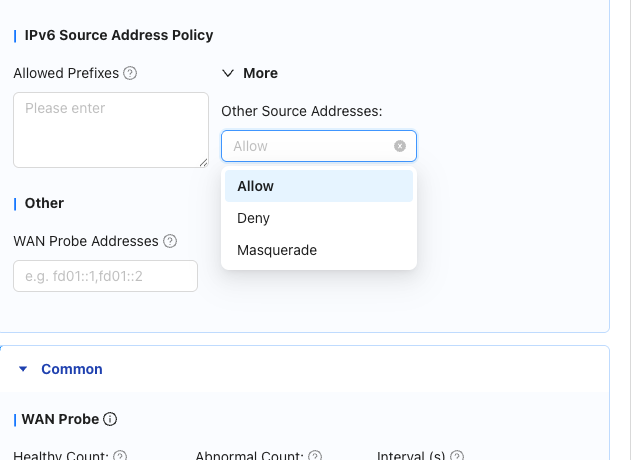
Click to view IPv6 source network segment policy configuration instructions
By default, the traffic in the IPv6 source network segment will add the network segments in the exclusive address pool to the allowed network segments.
For source network segments that are not in the address pool, the following three processing methods are supported:
"Allow": Directly allow the traffic to pass without performing source address translation.
"Discard": Discard the traffic directly without forwarding it.
"Convert to outgoing interface address": Perform SNAT on the traffic and convert it into the IPv6 address of the outgoing interface for forwarding.
This configuration ensures that IPv6 traffic from different sources can be flexibly adapted to network security and policy requirements.
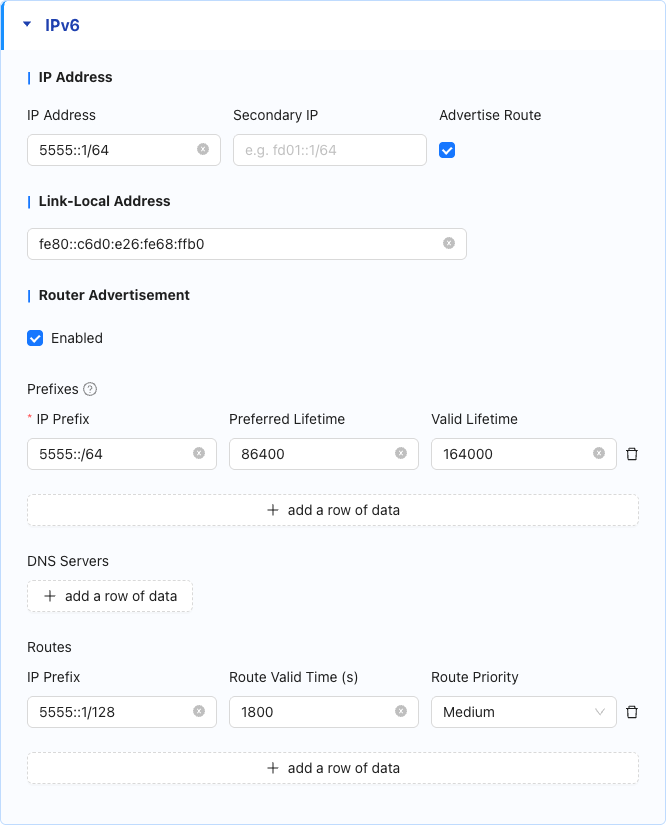
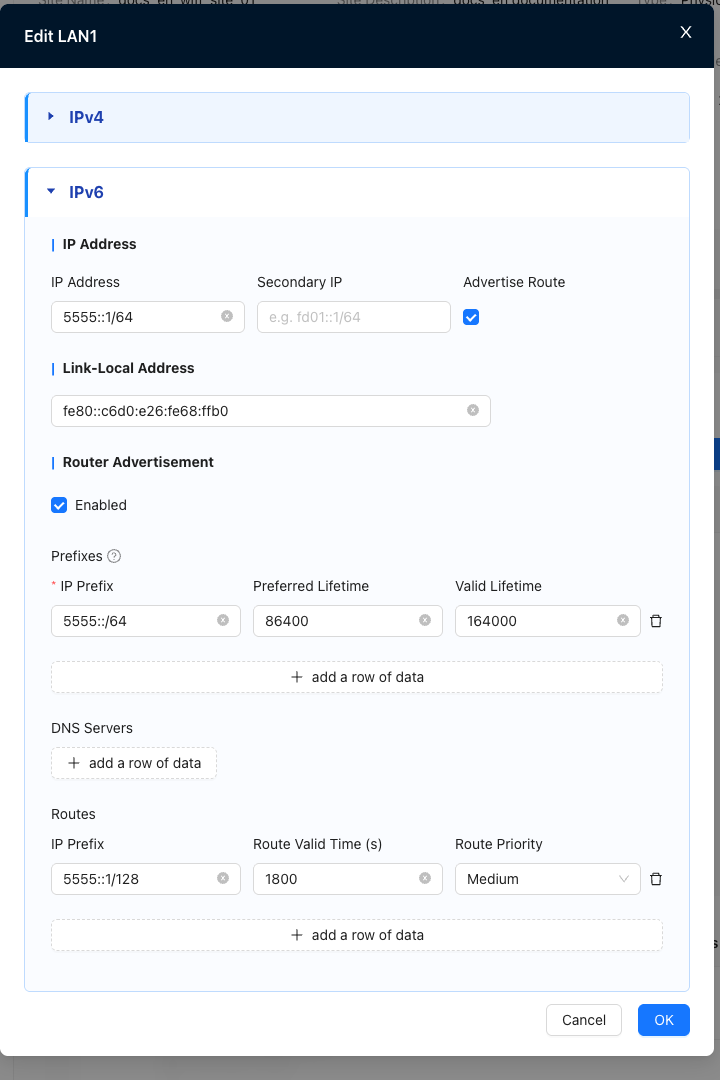
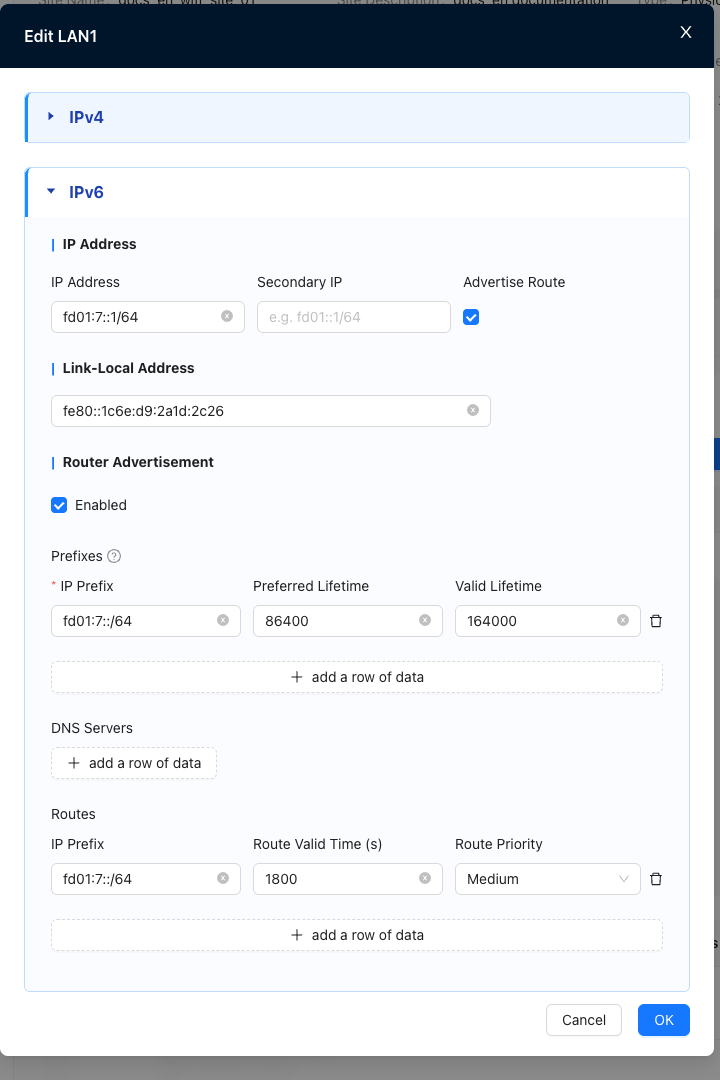
🔹 Configure the site LAN port IPv6 address and enable RA notification
『Tenant』→『Config』→『Sites』→『Edit Site』→『VRF Configuration』→『LAN』→『Settings』
Prefix information must be configured after turning on RA
Configure routing information
🔹 Check the simulator and LAN association on the OAM page
『Tenant』→『Monitor』→『Sites』→『Site Detail』→『Operations』→『Diagnostics』→『Simulator』

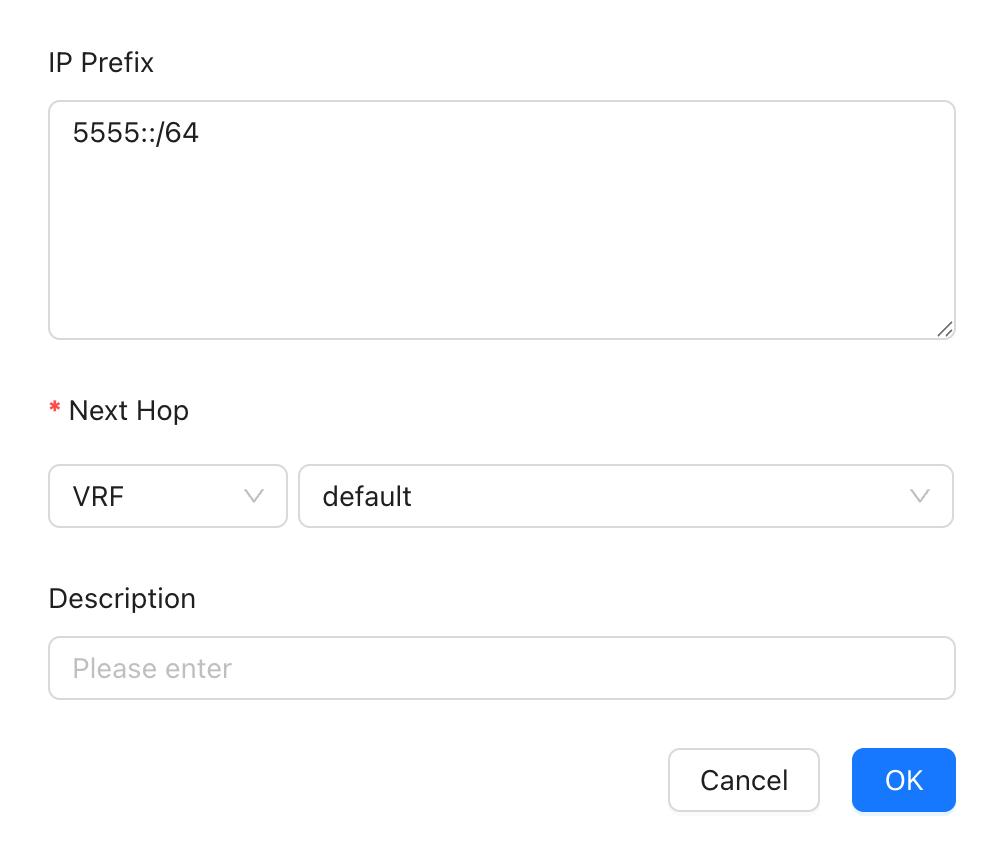
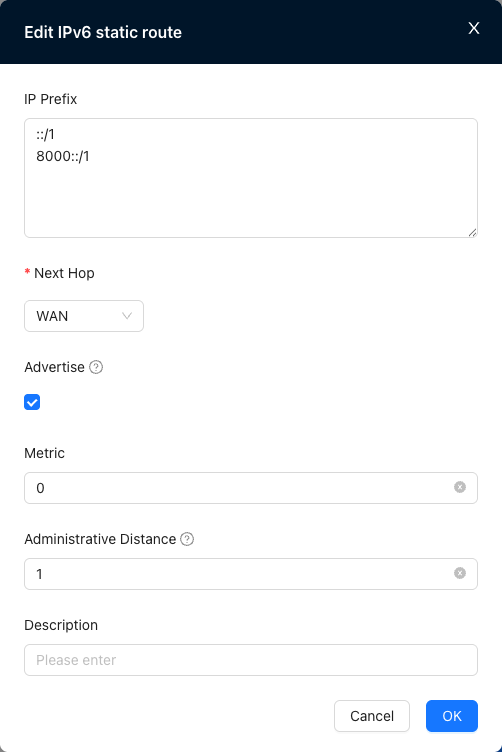
🔹 The site configures IPv6 static routing globally, and the next hop points to VRF
『Tenant』→『Config』→『Sites』→『Edit Site』→『Global Configuration』→『WAN』→『Static Routes』
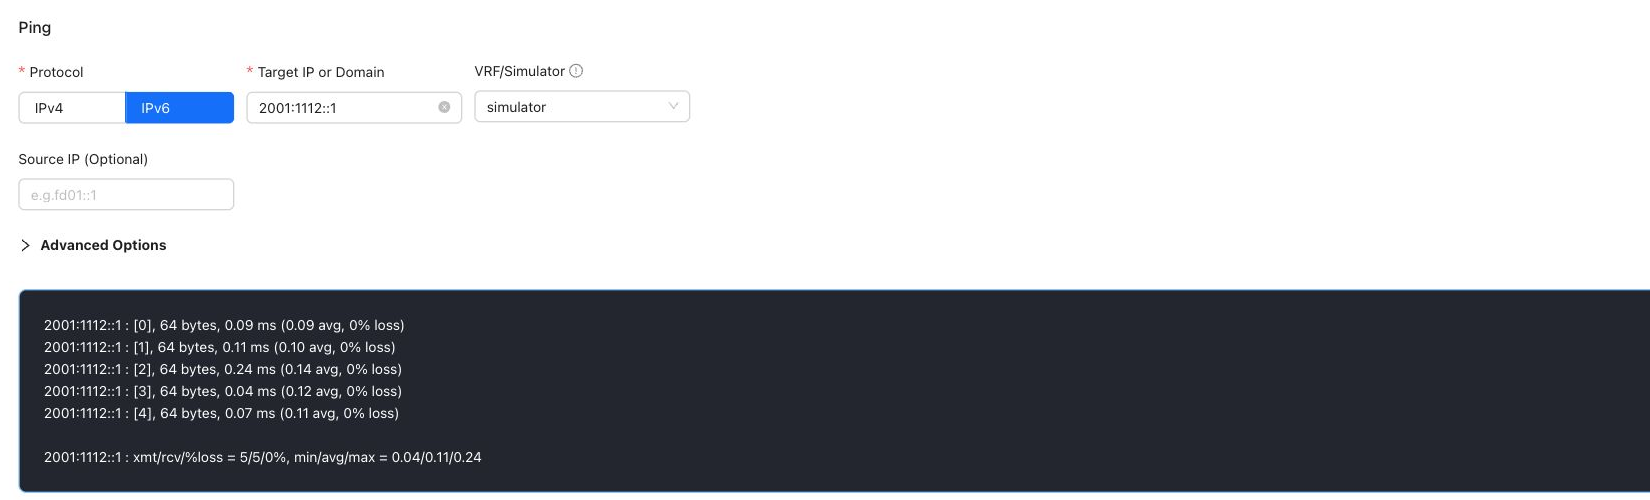
🔹 Perform IPv6 Ping diagnosis on the OAM page
『Tenant』→『Monitor』→『Sites』→『Site Detail』→『Operations』→『Diagnostics』→『Connectivity』
Select IPv6, choose simulator in VRF/Simulator, and use the LAN IPv6 gateway address as Target IP or Domain.

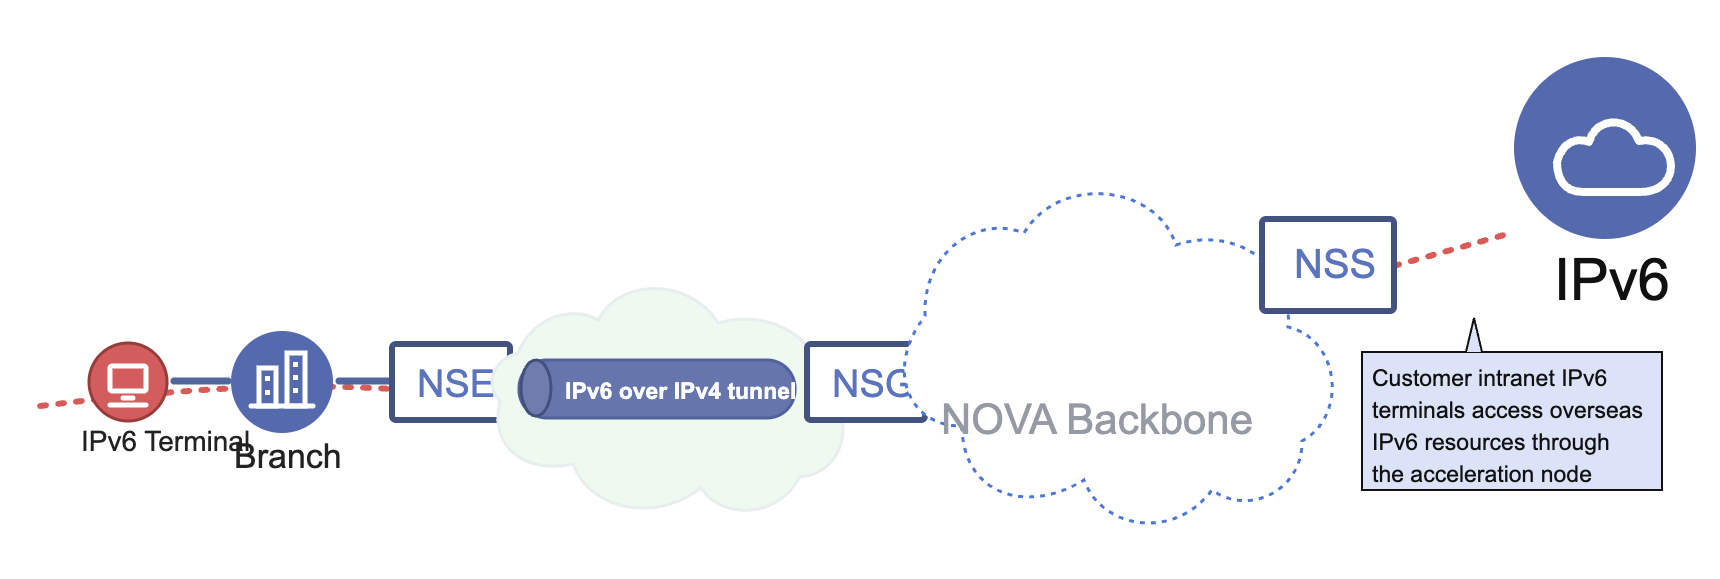
Scenario 2: The customer's intranet IPv6 terminal accesses overseas IPv6 resources through the acceleration node.
🔹 The site enables IPv6 function
『Tenant』→『Config』→『Sites』→『Edit Site』→『Global Configuration』→『Features Toggle』
🔹 Configure IPv6 address for site WAN and create tunnel using IPv6 address
『Tenant』→『Config』→『Sites』→『Edit Site』→『Global Configuration』→『WAN』→『WAN Configuration』
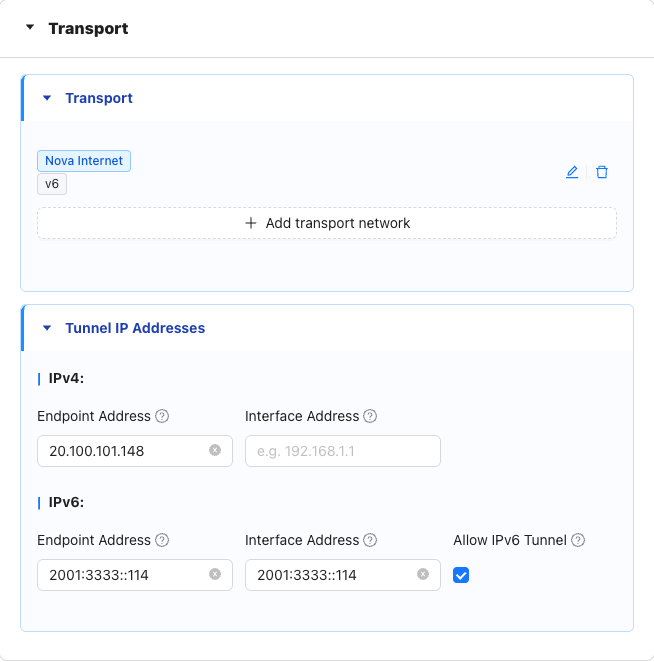
Click to see how to view tunnel information on the command line
NE900:xtest14:~# config -u tunnels
[
    {
        "af": "v6",
        "data_port": "1444",
        "esp": "default",
        "ike_port": "1443",
        "index": 2,
        "interface": "wan2",
        "left": "any",
        "leftid": "xtest142",
        "leftsubnet": [
            "100.125.3.4/32",
            "100.125.3.2/32"
        ],
        "meta": "cpe2vpe",
        "mode": "ipsec",
        "name": "xtest14:2:jiajia-vpe1:3",
        "origin": "controller",
        "right": "2001:3333::14",
        "rightid": "jiajia-vpe13",
        "rightsubnet": [
            "100.126.1.150/32"
        ]
    }
]
total: 1
🔹 Configure the site LAN port IPv6 address and enable RA notification
『Tenant』→『Config』→『Sites』→『Edit Site』→『VRF Configuration』→『LAN』→『Settings』
Prefix information must be configured after turning on RA
Configure routing information
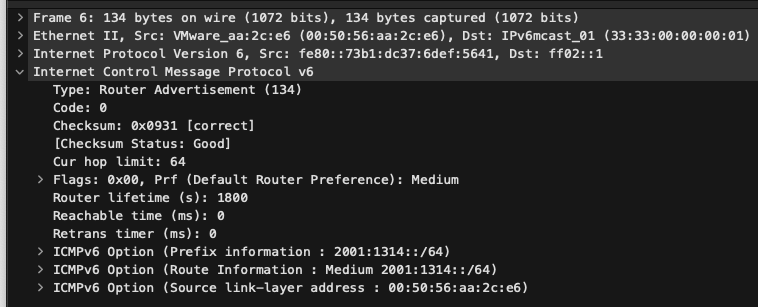
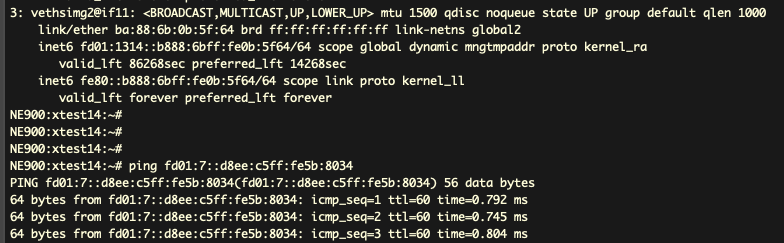
Click to see how to capture RA packets on the LAN port
If you are not sure whether RA is working, you can capture RA messages on the LAN port after enabling it.
The source is the lan port LLA address

🔹 Configure the emulator on the OAM page and obtain the IPv6 address
『Tenant』→『Monitor』→『Sites』→『Site Detail』→『Operations』→『Diagnostics』→『Simulator』

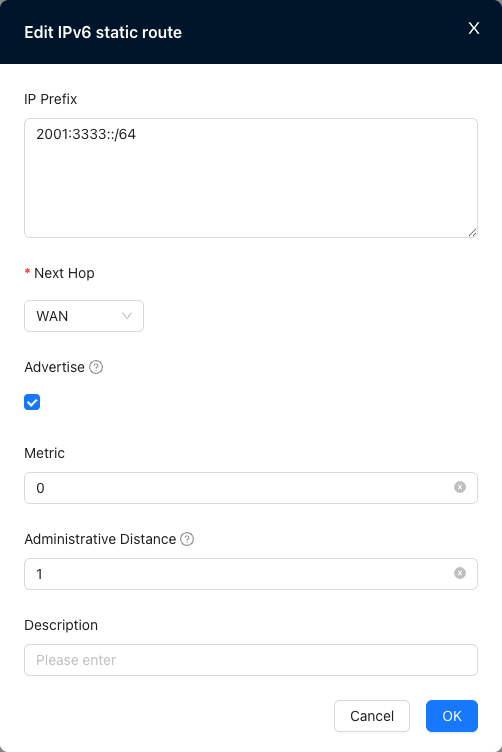
🔹 Configure IPv6 static routing on the Nova Gateway advanced configuration page
『Tenant』→『Config』→『Network Service』→『Nova Gateways』→『Edit Nova Gateway Config』→『Route』→『Static Routes』
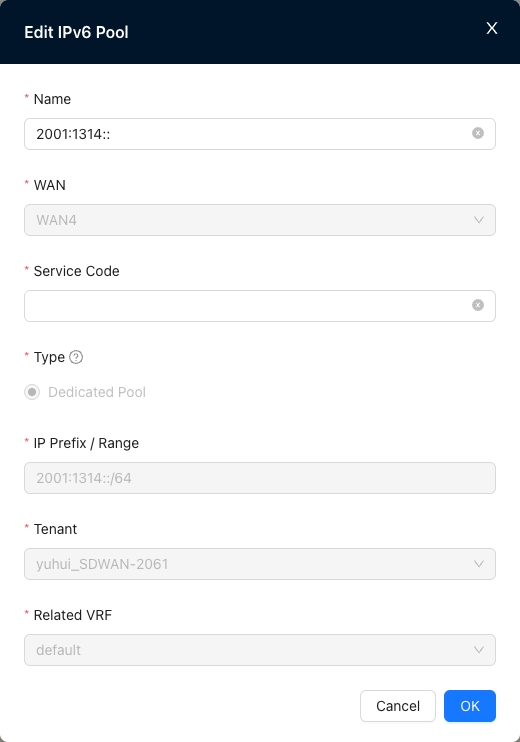
🔹 Configure NSS exclusive IPv6 address pool
『Provider』→『Resource』→『Gateways』→『Edit Gateway』→『Advanced』→『IP Pools』
🔹 Perform network connectivity diagnosis on the OAM page
『Tenant』→『Monitor』→『Sites』→『Site Detail』→『Operations』→『Diagnostics』→『Connectivity』
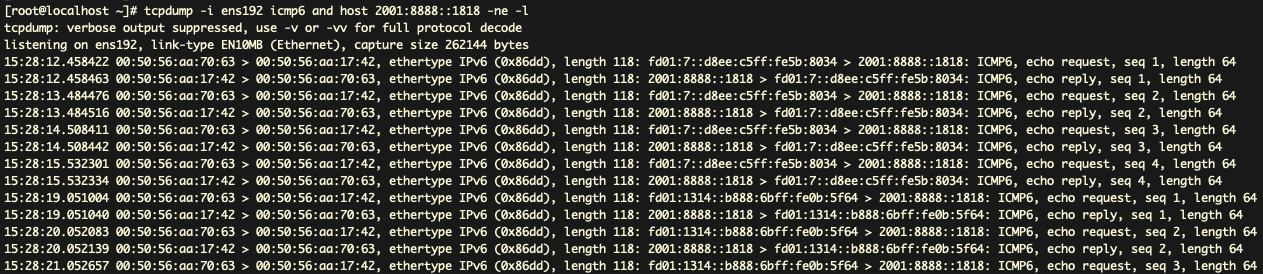
Click to view the packet capture results on the outgoing port

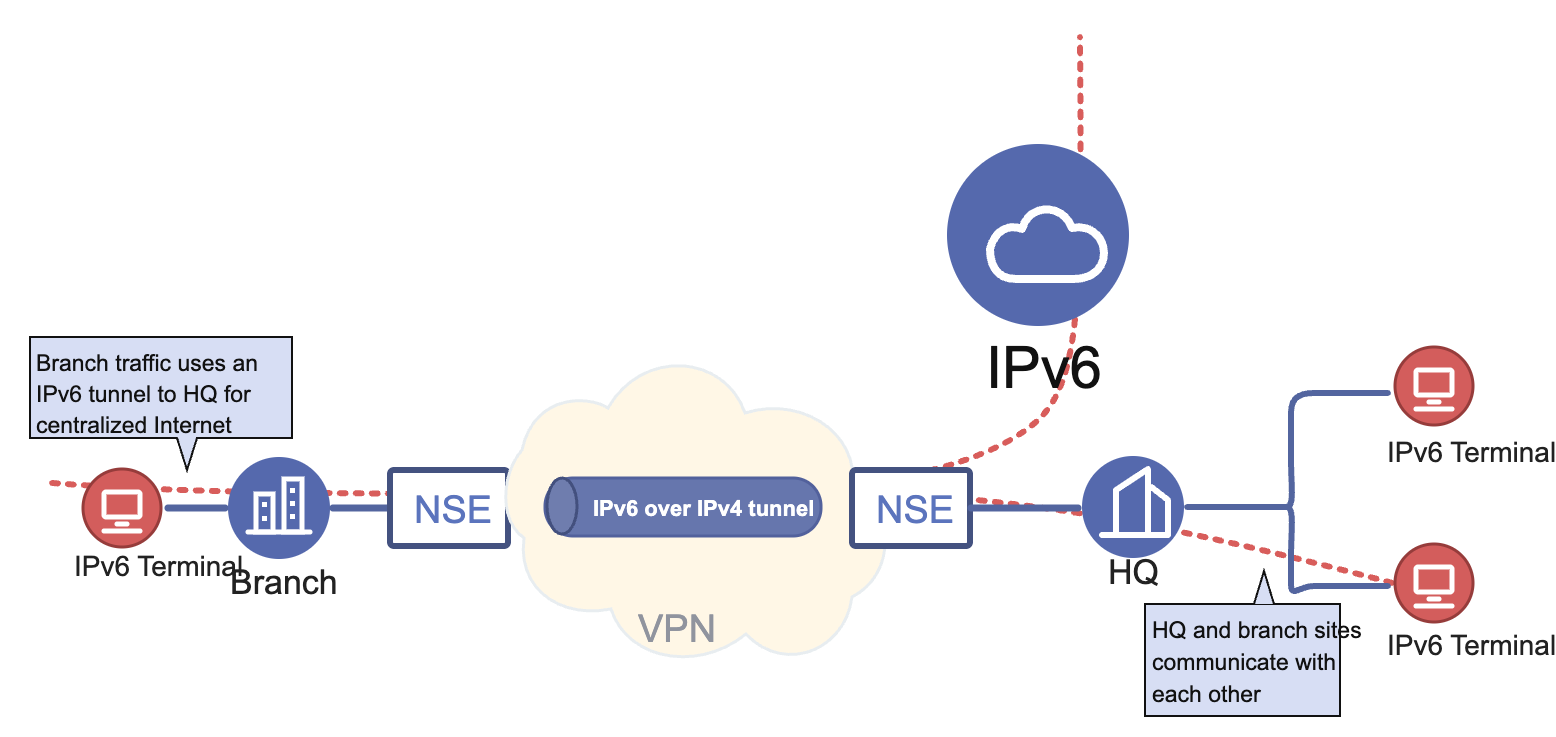
Scenario 3: The v6 branch of the customer's intranet goes to the headquarters via HS internet for centralized Internet access & mutual visits with the headquarters
🔹 IPv6 function is enabled at the headquarters/branch sites
『Tenant』→『Config』→『Sites』→『Edit Site』→『Global Configuration』→『Features Toggle』
🔹 Configure the IPv6 address for the headquarters site WAN and create a tunnel using the IPv6 address
Headquarters WAN IP source network segment policy is configured as "Allow"
🔹 Configure IPv6 address for branch site WAN and create tunnel using IPv6 address
『Tenant』→『Config』→『Sites』→『Edit Site』→『Global Configuration』→『WAN』→『WAN Configuration』

🔹 Configure the site LAN port IPv6 address and enable RA notification
『Tenant』→『Config』→『Sites』→『Edit Site』→『VRF Configuration』→『LAN』→『Settings』
Prefix information must be configured after turning on RA
Configure routing information
🔹 Configure the emulator on the OAM page and obtain the IPv6 address
『Tenant』→『Monitor』→『Sites』→『Site Detail』→『Operations』→『Diagnostics』→『Simulator』
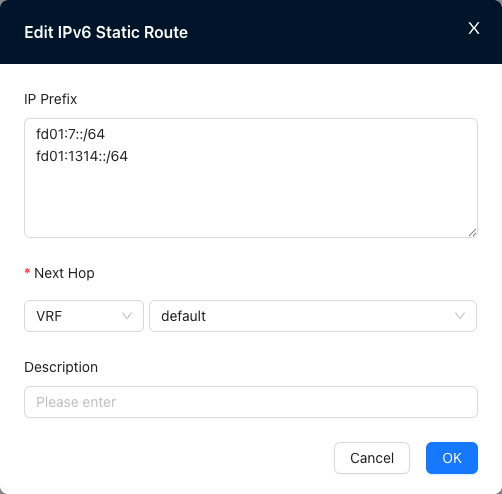
🔹 Configure VRF static routing at the headquarters site and publish IPv6 addresses
『Tenant』→『Config』→『Sites』→『Edit Site』→『VRF Configuration』→『LAN』→『Static Routes』
🔹 Configure global static routing at the headquarters site and point the headquarters/branch LAN segment to the corresponding VRF
『Tenant』→『Config』→『Sites』→『Edit Site』→『Global Configuration』→『WAN』→『Static Routes』
Click to expand to view the verification results
🔹 Branches can access headquarters equipment
🔹 Branches are connected to the Internet through the headquarters
🔹 Headquarters WAN IP source network segment policy is configured as "Convert to outgoing interface address"
